• Home
  • Latest Episodes
  • Tools + Materials
  • About
    • WHY WE CREATE
    • WHAT WE CREATE
    • WHO CREATES
  • Contact
  • Ben’s Blog

  • HomeMade Modern Instagram
  • HomeMade Modern Pinterest


Jul
30
By Ben Uyeda

EP93 DIY Dish Rack


This DIY Dish Rack is designed to fit over a sink. Full instructions can be found at HomeMade-Modern.com

This DIY dish rack was designed to slide across my sink. This design can be adapted to fit different sized sinks. The rack is made from maple boards that I bought from rockler.com


SUPPLIES:

HomeMade Modern ½” maple boards
Available at the Rockler
I used ½” thick maple boards from rockler.com

HomeMade ModernWood glue
Available at the Home Depot
I used Gorilla wood glue from Home Depot.

HomeMade ModernBioshield wood countertop finish
Available at the Green Building Supply
I used Bioshield wood countertop finish to give this rack a foodgrade finish.


TOOLS:
HomeMade Modern DIY RYOBI ONE+ 18 Volt Cordless Drill

HomeMade ModernRYOBI ONE+ 18 Volt Cordless Drill Available at Home Depot


HomeMade Modern DIY RYOBI ONE+ Circular Saw

HomeMade ModernRYOBI ONE+ Table Saw Available at Home Depot


HomeMade Modern DIY RYOBI Compound Miter Saw

HomeMade ModernRYOBI Compound Miter Saw
Available at Home Depot


HomeMade Modern DIY RYOBI Jig Saw

HomeMade ModernRYOBI Jig Saw
Available at Home Depot


HomeMade Modern DIY RYOBI Orbital Sander

HomeMade ModernRYOBI Orbital Sander
Available at Home Depot


INSTRUCTIONS:


STEP 1: Rip the boards
I used my table saw to rip the maple boards into 2 strips. The boards were 3” wide and I set the fence of the table saw to rip 1.75” wide strips.

This DIY Dish Rack is designed to fit over a sink. Full instructions can be found at HomeMade-Modern.com

STEP 2: Measure the sink
I measured my sink and marked the strips of maple. I made 2 sets of marks. One set that showed the width of the sink and a 2nd set that was about 1” past the first set.

This DIY Dish Rack is designed to fit over a sink. Full instructions can be found at HomeMade-Modern.com

STEP 3: Cut to length
I used my miter saw to cut the boards to length. I also cut short pieces of the thinner strips to use as spacers.

This DIY Dish Rack is designed to fit over a sink. Full instructions can be found at HomeMade-Modern.com

This DIY Dish Rack is designed to fit over a sink. Full instructions can be found at HomeMade-Modern.com

STEP 4: Mark notches on the wider boards
I marked notches on the wider boards so that the rack will fit nicely within the sink.


This DIY Dish Rack is designed to fit over a sink. Full instructions can be found at HomeMade-Modern.com

STEP 5: Cut the notches
I used my jigsaw to cut the notches. It is helpful to use additional boards so that the guard of the saw has a place to rest when cutting the thin boards.

This DIY Dish Rack is designed to fit over a sink. Full instructions can be found at HomeMade-Modern.com

This DIY Dish Rack is designed to fit over a sink. Full instructions can be found at HomeMade-Modern.com

STEP 6: Glue the pieces together
At this time I didn’t have long clamps so I had to glue the rack together into 2 pieces.

This DIY Dish Rack is designed to fit over a sink. Full instructions can be found at HomeMade-Modern.com

This DIY Dish Rack is designed to fit over a sink. Full instructions can be found at HomeMade-Modern.com

This DIY Dish Rack is designed to fit over a sink. Full instructions can be found at HomeMade-Modern.com

STEP 7: Add screws
I don’t trust glue alone in applications that are exposed to water so I drove long finish screws through the pieces. I didn’t the screw heads to show and I didn’t want the hard maple to split so I predrilled holes before driving the screws and also drilled ½” diameter holes that would allow me to glue wood plugs over the top of the screws. I used long finish crews from both sides to connect the 2 pieces of dish rack.

This DIY Dish Rack is designed to fit over a sink. Full instructions can be found at HomeMade-Modern.com

This DIY Dish Rack is designed to fit over a sink. Full instructions can be found at HomeMade-Modern.com

This DIY Dish Rack is designed to fit over a sink. Full instructions can be found at HomeMade-Modern.com

STEP 8: Glue in the wood plugs
I glued short pieces of ½” diameter wood dowels into the holes and then used my Japanese handsaw to cut them flush to the surface.

This DIY Dish Rack is designed to fit over a sink. Full instructions can be found at HomeMade-Modern.com

This DIY Dish Rack is designed to fit over a sink. Full instructions can be found at HomeMade-Modern.com

STEP 9: Sand the rack
I used my orbital sander to sand the rack with 220 grit paper.

This DIY Dish Rack is designed to fit over a sink. Full instructions can be found at HomeMade-Modern.com

STEP 10: Finish
I finished the rack with Bioshield wood counter finish.

If you like this project, please share it!

If you want to see what we're working on next, follow us on Instagram: @benjaminuyeda and @ijessup.

Also check out our book for additional projects, DIY tips and guides.


Tweet

  • Shopping Cart

  • The Latest From HMM

    • OEKO-TEX
      Ben Uyeda shares why he likes sustainable towel brand OEKO-TEX.
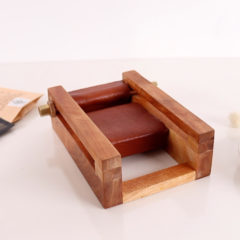
    • EP151 DIY Joint Roller
      Ben makes a DIY joint roller.
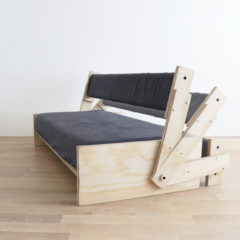
    • EP150 DIY Sofa Bed
      Ben design and builds a DIY Convertible Sofa Bed with three basic power tools.
    • EP149 DIY Easy-To-Build Plywood Desk
      Ben Uyeda builds an easy plywood desk.
    • EP148 DIY Easy-Build Desks
      Ben Uyeda builds 3 different desks that each take under 2 hours.
  • Join RYOBI Nation

    RYOBI Nation

    Share your HomeMade Modern projects on RYOBI Nation.

    Promo Code: HMM

  • Tools + Materials

    HomeMade Modern Tools + Materials
    Learn about the tools and materials we like working with at HomeMade Modern.
    See Tools + Materials

  • Subscribe to HMM

    Get email updates on our latest projects and upcoming book release.
  • Talk to Us!

    Have an idea, comment or question?
    Send Us A Message


  • About HomeMade Modern

    HomeMade Modern is an online design source that publishes easy-to-follow, DIY recipes for creating modern home furnishings.

    We provide creative ideas for making affordable alternatives to pricey designer home goods and cheap, plastic and particle-board junk.

    Privacy Policy

  • The Latest from HMM

    • OEKO-TEX
      March 21, 2021
    • EP 151 DIY Joint Roller
      August 26, 2020
    • EP150 DIY Sofa Bed
      April 28, 2020
  • Subscribe to HMM

    Get email updates on our latest projects and upcoming book release.
  • Ben’s Recent Pins

    Deseo No.3 sculpted side stool by Pietro Franceschini Sold exclusively by Galerie Philia Materials: White Onyx Dimensions: W 36cm, L 35cm, H 45cm Origin: Italy (Carrara) Manufacturer: Corsanini SRL Available in other marbles. Pietro Franceschini Architect // Designer Pietro Franceschini is an architect and designer based in New York and Florence. He was educated in Italy, Portugal and United States. After receiving his B.Arch cum laude from Università degli Studi di Firenze and his M.S.Arch with 1st class honour from Pratt Institute, he collaborated among others with Leeser Architecture in Brooklyn, Claudio Nardi in Florence, Laisné Roussel in Paris and Carlo Ratti Associati in New York. His latest project - PFStudio - was born as an interior and furniture design practice.
    Jean Jacques (@jeanjacquesbalzac) • Instagram photos and videos
    Jean Jacques (@jeanjacquesbalzac) • Instagram photos and videos
    Follow Me on Pinterest More Pins

Sponsored by
Copyright © 2015 HomeMade Modern. All Rights Reserved.