


The Latest From HMM

OEKO-TEX
Ben Uyeda shares why he likes sustainable towel brand OEKO-TEX.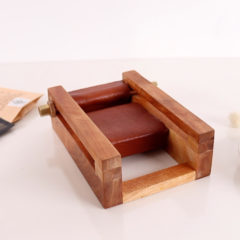
EP151 DIY Joint Roller
Ben makes a DIY joint roller.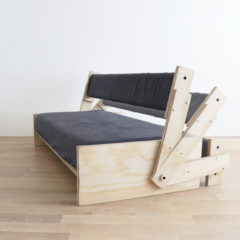
EP150 DIY Sofa Bed
Ben design and builds a DIY Convertible Sofa Bed with three basic power tools.
EP149 DIY Easy-To-Build Plywood Desk
Ben Uyeda builds an easy plywood desk.
EP148 DIY Easy-Build Desks
Ben Uyeda builds 3 different desks that each take under 2 hours.
Join RYOBI Nation
Tools + Materials

Learn about the tools and materials we like working with at HomeMade Modern.
See Tools + Materials
May
22
By Ben Uyeda

These copper tiki torches are one of my favorite outdoor DIY projects. They're modern, clean-looking and are easy to make. I made them two different ways and anchored them with concrete footing made of Quikrete Fast-Setting concrete mix. I exposed the copper pieces together for the first version, which is really easy. For the second one, I tried soldering the pieces. This was the first time I soldered copper and it was definatly a learning experience. Copper is one of my favorite materials, but can be a bit pricey.
SUPPLIES:
Available at the Home Depot
I used a 5’ length of type M copper pipe to use as a pole for mounting the torches.
Available at the Home Depot
I used 8” of 1” copper pipe for each torch.
Available at the Home Depot
I used 2 of these 1" to 1/2" copper reducers for each end of the torches.
Available at the Home Depot
I used one of these plugs to create a stop inside the bottom reducer in the torches.
Available at the Home Depot
This reducer holds the wick in place.
Available at the Home Depot
I used a short length of PVC pipe to create a socket for the copper poles.
Available at the Home Depot
This mix is by far the easiest I've found to make foundations for outdoor projects. You don’t even need to mix it. All you need to do is dig a hole, pour it in and add water.
Available at the Home Depot
I used 3 inches of gravel in the bottom of the hole I dug for the foundation.
Available at the Home Depot
I took the wick out of an old tiki torch at my parents' house.
Available at the Home Depot
I used citronella fuel for my tiki torches since it keeps bugs away.
Available at the Home Depot
I used steel wool to polish the copper torches.
Available at the Home Depot
If you don’t feel comfortable soldering, then I recommend using this 2-part epoxy.
TOOLS:
Available at Home Depot
I used a rigid tube cutter to cut the copper pipes.
Available at Home Depot
This basic plumbers torch kit was intimdating at first, but actually inexpensive and easy-to-use.
INSTRUCTIONS:
I cut a 8" piece of the 1" diameter copper tubing using my rigid tube cutter.


I pounded the 1/2" plug into the 1" side of the 1" to 1/2" reducer. I used a piece of dowel and a hammer to do this. I wanted the plug to stick in just enough for it to hold while I used epoxy to seal it. If you hammer it in too far, you won't be able to put the 1/2" copper pipe into the 1/2" side of the reducer.

I polished the 1" diameter piece of pipe using steel wool. I then used 60 grit sand paper to rough up the ends so that the epoxy could grip to the copper.

I mixed the 2-part epoxy and applied it to the inside of the 1" side of the reducer to seal the 1/2" plug. I then glued in the 1" pipe, the top reducer and the 1/2" copper pipe before using a clean rag to wipe off any extra epoxy.


I used a post hole digger to dig an 18" deep hole.

I poured 3" of gravel into the hole and packed it down with a piece of 2x4.


I poured the concrete mix directly into the hole.

I used the PVC pipe as a socket for receiving the copper pipe. I normally would use a PVC cap, but I forgot to get one so I used duct tape to close one end of the PVC pipe. I pounded the pipe into place and used a level to adjust it until it was perfectly vertical.


My favorite thing about this mix is that you don’t have to mix it! I just added water, walked away, came back in 4 hours and it was hard enough for me to cut the extra pipe off.


I wrapped some rubber bands around the copper torch and stuck it into the PVC pipe. The rubber bands make the fit nice and snug.


I used a funnel to fill the torch with fuel, slid the 1/2" to 3/8" reducer over the wick and then inserted it into the torch. The wick needed a few minutes to soak up fuel, but lit up nice and bright the first time. I was worried that the heat would melt the epoxy, but was surprised to find that the copper didn’t get that hot. I let it burn for an hour and it was fine. I took a reducer and another 1/2" plug to create a cap for snuffing out the flame and protecting the torch from rain.

Soldering Option:
Gluing the pipes together with epoxy is easy, but I've been wanting to learn how to sweat copper for quite a while, so I bought a soldering kit from the Home Depot and made a second torch.
I used special brushes to scratch up the copper pipes and fittings before applying flux and connecting the joints.


Then, I heated up the joints with a propane torch and applied the solder, which melted into the hot copper joints. It took a while to get the hang of it and my second joint was a lot cleaner looking than the first.


I tested each joint with water to make sure that my torch would not leak fuel.

I'll be posting more tips and instructions for soldering when I get a little more experience.


Good luck making your own copper tiki torches and please email or tweet photos to @benuyeda or ben@homemade-modern.com. For more detailed instructions, dimensioned drawings and different variations of the project, check out our soon-to-be-released book.


 Manufacturer: Corsanini SRL Available in other marbles. Pietro Franceschini Architect // Designer Pietro Franceschini is an architect and designer based in New York and Florence. He was educated in Italy, Portugal and United States. After receiving his B.Arch cum laude from Università degli Studi di Firenze and his M.S.Arch with 1st class honour from Pratt Institute, he collaborated among others with Leeser Architecture in Brooklyn, Claudio Nardi in Florence, Laisné Roussel in Paris and Carlo Ratti Associati in New York. His latest project - PFStudio - was born as an interior and furniture design practice.")