


The Latest From HMM

OEKO-TEX
Ben Uyeda shares why he likes sustainable towel brand OEKO-TEX.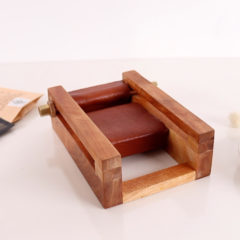
EP151 DIY Joint Roller
Ben makes a DIY joint roller.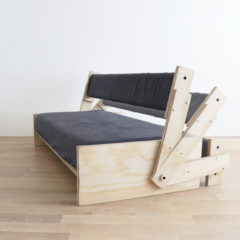
EP150 DIY Sofa Bed
Ben design and builds a DIY Convertible Sofa Bed with three basic power tools.
EP149 DIY Easy-To-Build Plywood Desk
Ben Uyeda builds an easy plywood desk.
EP148 DIY Easy-Build Desks
Ben Uyeda builds 3 different desks that each take under 2 hours.
Join RYOBI Nation
Tools + Materials

Learn about the tools and materials we like working with at HomeMade Modern.
See Tools + Materials
Feb
17
By Ben Uyeda

We built these concrete patio pavers with cedar accent decks for the shipping container house I am building out in Joshua tree CA. If you'd like to watch the container house series, click here.
The sun out here in the California desert is quite harsh and I wanted materials that could withstand the constant UV abuse. Concrete pavers are ideal, but I liked the idea of adding some wood accent decks to break it up visually and create outdoor spaces that are flush to the interior floors. Western Red Cedar was the ideal choice since it can stand up to the sun without cracking and will weather to a nice silver grey that will match the paint on the house. I like the paver and gravel combination because it’s a forgiving design for beginner level builders. Unlike a solid concrete patio these pavers don’t have to have a slope that will funnel rain in a particular direction.
KEY PRODUCTS:
We used 12-foot long Appearance Knotty Grade timbers
INSTRUCTIONS:
We built the forms for the concrete pavers out of 2x4s screwed together with 3” long deck screws. We made the pavers forms about 4’-6” by 2’-6”. The bigger the pavers the thicker they need to be to prevent cracking. We left 5”-8” gaps in between the pavers to fill in with gravel. We started the forms in the center in between the containers and then added more forms out from this center point. This made it easier to keep the pattern consistent. We screwed some short 2x4 pieces to the top of the frames so that we could rest the frames even to the edges of the concrete foundation slabs.


I pounded the steel stakes into the ground and then screwed through the stakes and into the 2x4s after checking to make sure they were level.


The ground was already packed down hard and mostly clay and rock, so we didn’t need to do any additional compacting. We shoveled in a couple inches of sand into the bottom of the forms before adding in the steel reinforcement. We had some #4 rebar left over from the foundations for the house, so we started with that. We cut it with an angle grinder and then wired it together on top of concrete dobies. Dobies are little concrete blocks with wires sticking out used to hold steel reinforcement off the ground. Later we switched to steel mesh which is a little easier to use than the rebar. A friend suggested spraying the forms with vegetable oil, so we tried it on some of the forms but really didn’t see that much of a difference. The wood came off easily in both cases.


Typically, I mix and pour the concrete by hand, but we have over 1000 square feet of pavers to pour so I bought a cement mixer from Home Depot and hired some laborers for this project. We started with just a couple hundred square feet to test out our process. We mixed Quikrete 5000 in the mixer and poured it in the forms. We used rakes and shovels to distribute the concrete and then used a piece 2x4 to screed the top until it was level. We don’t need these pavers to be as smooth as a countertop, so we only spent about 5 to 10 minutes troweling each paver.


After letting the concrete cure for 3 days we stripped away the 2x4s. We couldn’t reach the heads of the all the screws, so we had to use a prybar to pry some of the wood pieces apart.


Once I saw that this system was going to work out nicely I hired additional workers and we poured the res of the pavers in a single morning.

I picked up a couple truckloads of ¾” gravel and poured it in between the pavers.

This process is inexpensive material wise but physically demanding and labor intensive. Each bag of Quikrete 5000 weighs 80lbs and just moving them into position is exhausting. The result though is worth is because I got a very durable nice looking patio and spent just about $6 per square foot and that includes buying the cement mixer and hiring the labor.

The concrete pavers are great, but I wanted some wood decks that would be even with the interior floors just outside of the doors. I decided to use 6x6 solid cedar timbers and this is definitely over kill but I just really like the idea of a solid deck with no exposed easterners and the pavers were cost effective, so I didn't feel bad about getting a little fancy with the wood accents. If you wanted to make a more cost-effective version of this deck I would suggest using 2x6 cedar on top of 4x4 runners to replace the composite decking.

I used my palm rounder with a 3/8" round over bit to round over the ends of the cedar timbers.


I cut some pieces of 1x6 composite decking and placed them on the concrete and set the first 6x6 on top and slid it all the way up against the house. I connected the pieces with galvanized L-brackets and ¾” screws. This is not a structural connection, but it will hold them in position.


I used the palm router to cut notches that will allow the next 6x6 to fit over the L-brackets. I then placed the 2nd 6x6 using some scraps of 3/16" angle steel as a spacer.


I am using 10” lag screws to connect the 6x6s. These screws have large heads that will not fit in the gaps between the 6x6s, so I used a 1-1/4” bit to drill holes about 1” deep so that the heads will be recessed. I then used an extra-long 5/16” drill bit to drill pilot holes for the lag screws. This makes driving the lag screws easy.


I kept repeating this process adding about half a foot of decking with each timber.


On the last 6x6 I drilled the 1-1/4” holes about 2 inches deep so that I could use a wood dowel to hide the heads of the lag screws. I used my Japanese pull saw to trim the dowel and then sanded it flush with my orbital sander.


The cedar timbers were appearance grade and already pretty smooth, so I just focused on a few splintery parts and then gave the entire surface a light sanding with 150 grit pads on my orbital sander.

I have often specified cedar in the north east with my architecture firm zeroenergy.com and have seen how weathering stains and sealers have changed the color of the wood. Some of them are ok but it’s hard to apply them evenly and each piece of wood can react differently resulting in a blotchy appearance. I would consider a water sealer in a climate that gets more rain and less sun but here in the desert I have seen sealers flake off with UV damage. A penetrating oil would be another option but that tends to bring out the orange colors in the wood and I prefer the natural look.
Good luck making your own bike rack and please email or tweet photos to @benuyeda or ben@homemade-modern.com
If you want to see what we're working on next, follow us on Instagram: @benjaminuyeda and @ijessup.
Also check out our book for additional projects, DIY tips and guides.


